


With the introduction of the Advance Design panel truck in mid 1947, it was soon evident that a serious safety hazard existed with a few companies, some night deliveries required the rear double doors to be open. This prevented the taillight from being seen! No doubt this caused some accidents particularly with a fast vehicle coming from behind, with dim older bulb headlights.
The General Motors Product Service Bulletin (issued regularly to dealers) dated May 31, 1948 relates to this condition. Though it is dated over a year after initial panel truck production, it warns dealers and offers an alternative to lessen this unsafe condition.
The following is a copy of the suggested GM modification to correct the problem. As this particular product service bulletin was issued in Canada for their Canadian dealerships, it is not known if the announcement was also made to dealers in the USA .
It may be of interest that this extra light #916877 also used the same number in the Chevrolet Master Parts Catalog as the left 1939 car taillight assembly. (It appears GM used no extra tooling to create this new panel truck extra.) Note: They even requested the dealer to solder the water drain hole in this car light and re-drill because of its different mounting position.
The following is taken from the May 31st, 1948 Product Service Bulletin.
Rear Signal Lamp Released - All Panel Trucks
Some requests have been received for a signal lamp, which would be visible on Panel trucks when the rear doors are open at night. This type of lamp, which will operate in conjunction with the tail lamp, can be mounted on the roof panel, as shown in Fig. 77. The material necessary to make this installation is shown in Fig. 78.
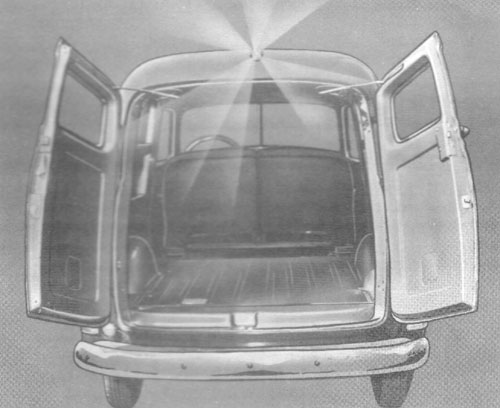
Fig. 77 (above)
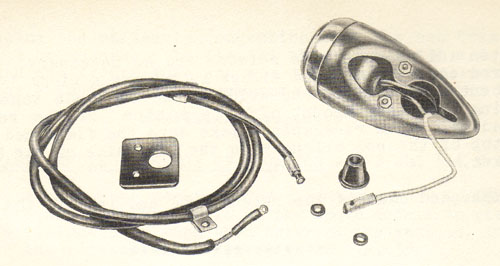
Fig. 78 (above)
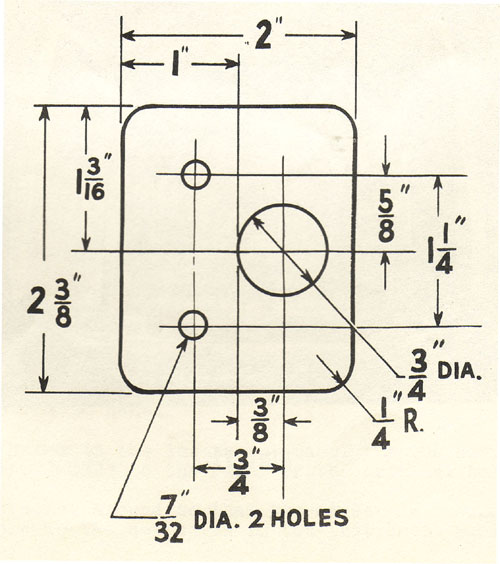
Fig. 79 (above)
Of the material listed in the chart, the insulated wire, the metal plate, and the two rubber washers are to be made up locally. The dimensions for the metal plate are shown in Fig. 79 and the dimensions for the rubber washers are given in fig. 80. Assemble the bayonet connection to one end of the insulated wire and the eye terminal to the opposite end. A drain hole will be found in the side of the lamp rim. this should be plugged with solder and the same size hole drilled in the bottom of the rim for drainage.
Fig. 80 (above)
The installation procedure is as follows.
1. Center the metal plate, Fig. 79, nine inches from the rear drip molding over the center of the rear doors.
2. Using the plate as a template, drill two 7/32" holes and one 3/4" hole in the roof panel.
3. Drill a 7/16" hole in the roof left side rail, "A" Fig. 81, and another 7/16" hole "B" in the lower side panel behind the left rear door.
4. Place the two rubber washers over the studs in the lamp and the rubber grommet around the wiring. Assemble the metal plate on the inside of the roof panel and install the lamp using the attaching stock supplied.
5. Connect the 6 ft. of insulated wire to the plain wire in the lamp by means of the bayonet connection. Note: A two filament bulb is used in the lamp. One 3 C.P. and the other 32 C.P. The plain wire connects the 3 C.P. filament. Cut of the other wire.
6. Thread the insulated wire through the holes drilled at "A" and "B" Fig. 81. Install one of the wiring clips under one of the screws in the rear door upper striker plate "D" and the other clip under the screw at the rear of the belt strainer "C". Compress the clips so that they fit snugly around the wire.
7. Connect the wire to the tail lamp switch "E" at the same terminal as the black tracer wire.
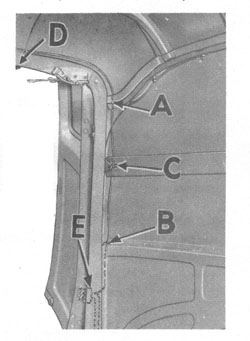
Fig. 81 (above)